Getting Started
See Downloading and Installation for tips on how to download and install the Toolkit.
Basic Concepts
The Python Integration Toolkit provides a way to communicate seamlessly between LabVIEW and Python.
To get started, you write a small Python script, or module, which contains Python variables, functions, and other objects. Then you tell LabVIEW to "connect" to this module. You now have live access to all the objects in that Python module; you can get and set variable values, call functions, or execute additional Python code.
Here's an example, to give you a flavor of how the Toolkit works. Suppose
you have just one Python function you want to call, that takes an array (or just a number),
squares it, and returns the result. Here's the Python code, saved to disk in
the file mymodule.py:
def square_it(myarray):
    return myarray**2
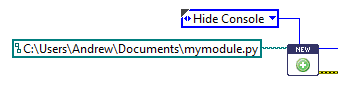
Here's the LabVIEW end of the conversation. We open a connection, package up our input array to send to Python, call the function, and then unpack the result into a LabVIEW array:

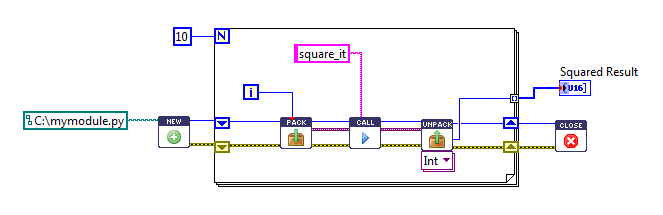
Crucially, you don't have to close the connection to Python right away; you
can execute multiple function calls, get and set variables, or perform other
operations for as long as you want. For example, here's a VI that calls
square_it ten times, and collects the results into an array:
So the concept is less like running a Python script, and more like an ongoing conversation between LabVIEW and Python. The Toolkit handles all the messy details like setting up communication with Python, handling type conversion, and translating Python exceptions to LabVIEW errors. All you need to do is write your Python-side and LabVIEW-side code, and it just works.
Writing your Python module
Note
The rest of this guide assumes you are using Enthought Canopy (see Downloading and Installation). Other environments support similar concepts but the details may vary.
A central concept for the Toolkit is that you should be free to develop your Python code using Python tools. That means a full installation of Python which is separate from LabVIEW, with its own editor, debugger, package installation and other facilities appropriate to Python development.
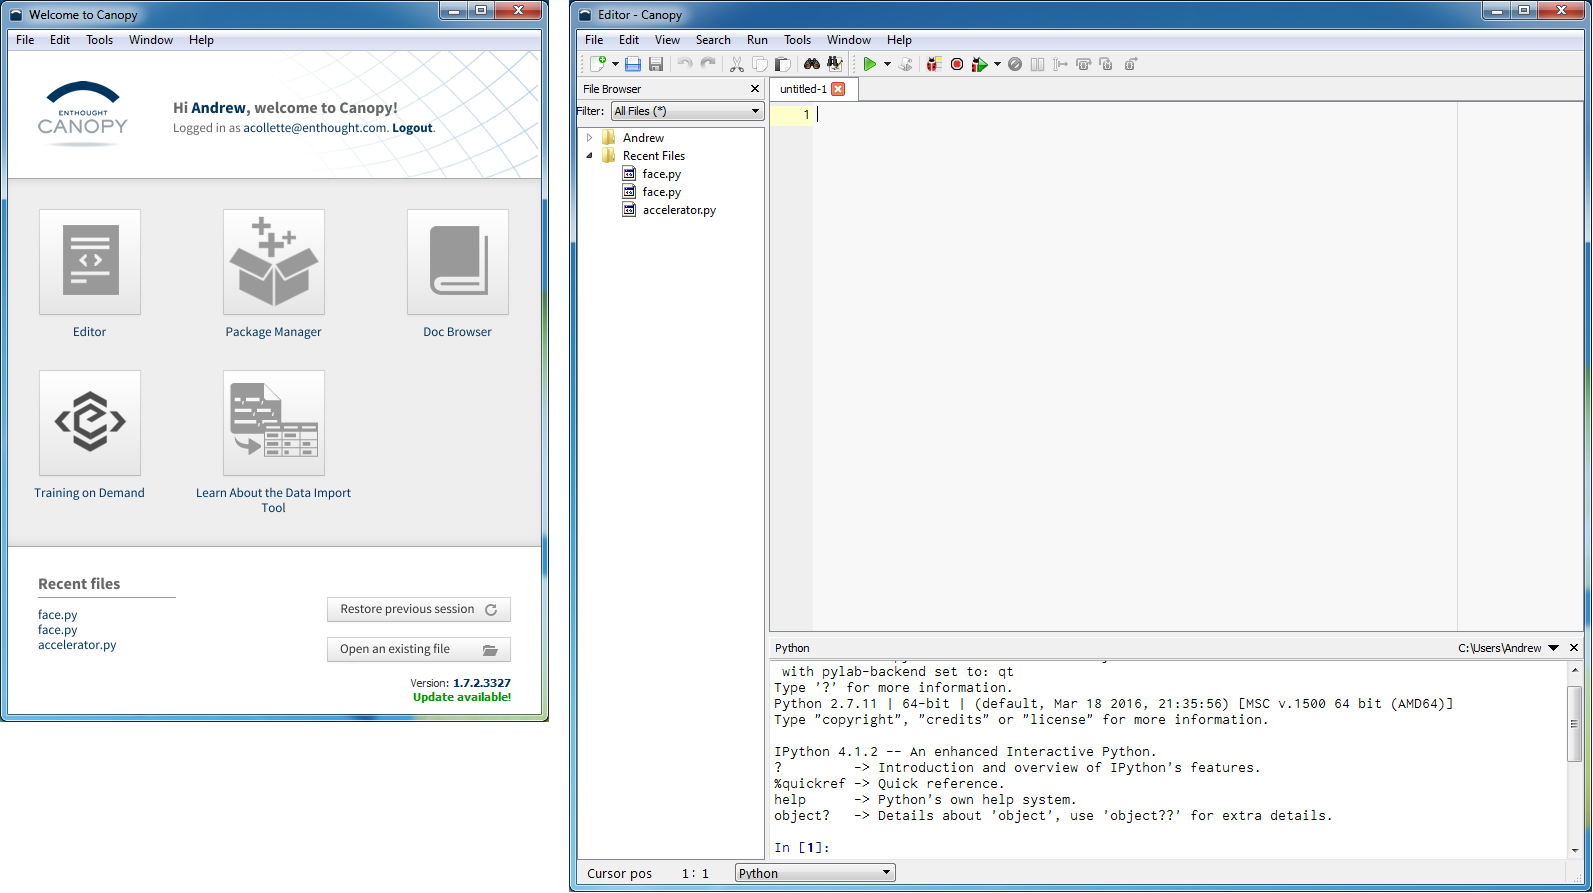
Once installation is finished, launch the Canopy welcome screen. From here you can launch the Canopy Editor, which is a full integrated development and analysis environment:
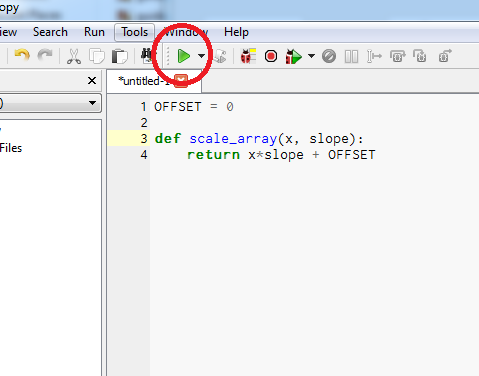
Let's write a trivial Python module, to see how development goes. We'll write a Python function which takes an array and applies a scale and offset; basically the classic y = mx + b. The function will take the array to transform, and the slope, but we'll define the offset in a separate Python variable:
OFFSET = 0

def scale_array(x, slope):
    return x*slope + OFFSET
You'll notice that unlike LabVIEW, none of the variables involved have an explicit type. This function will work with any type that supports addition and multiplication: integers and floats, including multidimensional arrays of either one.
This is a pretty simple function, but let's test it anyway. The Canopy IDE includes a live Python session where we can run this code and see how it behaves. Push the green "run" button to execute the code in Python:
Now we can test things out by entering commands at the Python prompt:
>>> scale_array(4, 2)
8
>>> OFFSET = 1
>>> scale_array(4, 2)
9
Using NumPy arrays
We tested the function we wrote using Python integers, and it worked well. But what if we want to test it with arrays? We might try this syntax, and be disappointed:
>>> scale_array([4,5], 2)
TypeError: can only concatenate list (not "int") to list
Not very informative. What's happening is that the expression [4, 5] creates
a Python list, which is the native kind of Python object used to store
differently typed pieces of data. For example, if you wanted to store an
integer, a string, and a floating-point number in one data structure, you might
use a list.
But we want to use an array, which is an efficient container designed to
hold many values of the same type. Python doesn't have a built-in type for
this, but there is a very widely deployed third-party package called NumPy
which provides such a type.
To get access to NumPy, we use an "import" statement, which will make the NumPy package available for us to use:
>>> import numpy
Now, all the functionality of the NumPy package is available for us to use,
under the name numpy. Let's create an array and try it out:
>>> myarray = numpy.array([4,5])
>>> scale_array(myarray, 2)
array([ 8, 10])
It's important to know about NumPy arrays, because they are the only type of array supported by the Python/LabVIEW bridge. You can send scalars, meaning single ints, floats, strings, or bools, or NumPy arrays of the same. Likewise, if you send a LabVIEW array to Python, it will show up as a NumPy array.
Read more about NumPy and how to use Python packages in Using Python.
Connecting to Python from LabVIEW
We're finished developing our Python module; it's pretty simple. There is one global variable, and one function that takes an array and adds a scale and offset:
OFFSET = 0

def scale_array(x, slope):
    return x*slope + OFFSET
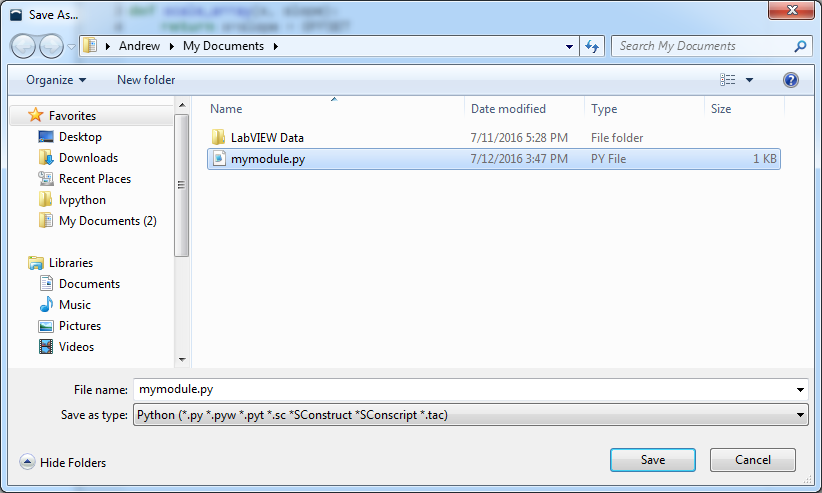
The next thing we do is save the Python module to disk, so it's available for use from LabVIEW. You can save the file anywhere; for this example, we'll save it under My Documents:
Now we'll turn to the LabVIEW side of things. Generally, you will call out to
Python as part of a larger program. But because this is a demo, we'll create
a VI whose whole purpose is to call that single Python function scale_array.
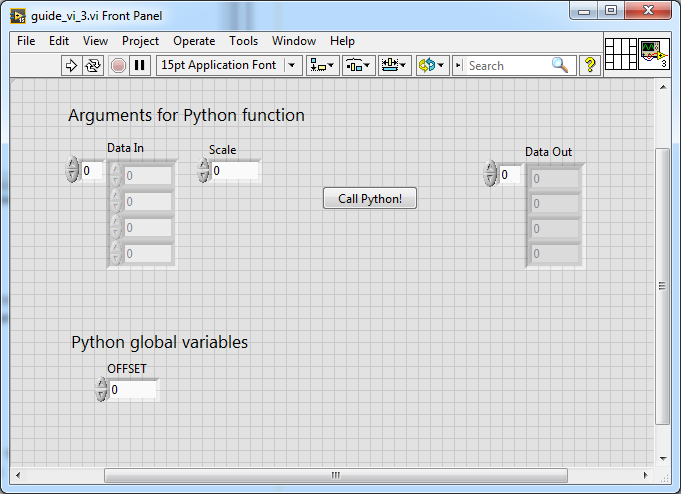
Here's the front panel; we have a double array we can provide as the x
argument, and a numerical control for the slope argument. There's also
a control we'll use for setting the Python global variable OFFSET:
Now let's look at the block diagram. We start by creating a new Python session. First, we use New Session and provide the path to the Python module that was just saved to disk:

This will launch Python and load the module we just wrote. Let's start
implementing the VI logic, beginning with the OFFSET Python variable.
We want to update the variable in Python every time our front-panel control
changes. Let's use LabVIEW's event structure for this:
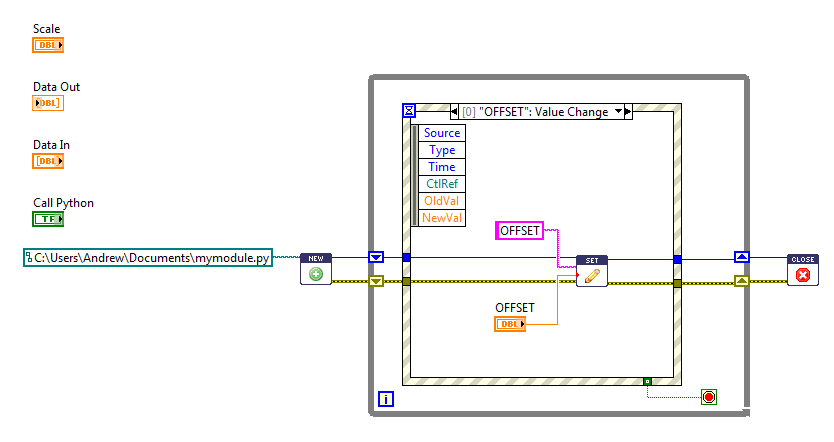
We've added a few extra things. Now, any time the value of the "Offset" front-panel control changes, we will call Set Value to update the value in Python. After the event loop exits, we also added Close Session to shut down the Python session and clean up any resources.
Now let's actually call Python. We'll do that when the "Call Python" button is clicked:
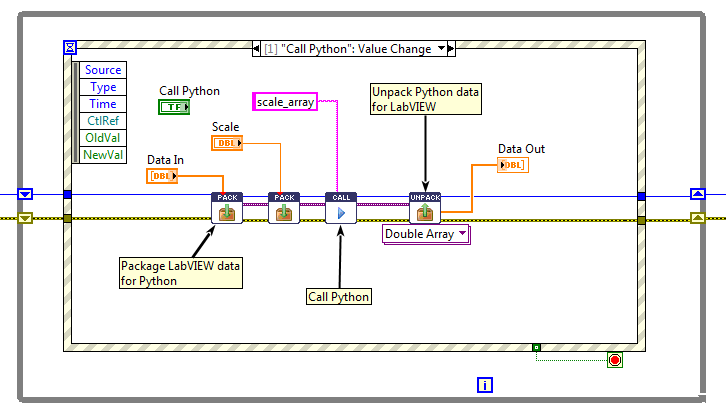
Recall that our Python function takes two arguments: the data to be processed, and a scaling factor. The first thing we do here is "package" the "Data In" array and "Scale" numeric from LabVIEW with Pack. This verifies that the data is of a supported type and prepares it to be sent to Python.
The next step is to call our Python function, using Call.
We give the name of the function,
scale_array, along with the previously packed objects. Finally, we use
Unpack to convert the returned array from the Python function into
a LabVIEW double array, and display it in the "Data Out" indicator.
And now we can run the VI:
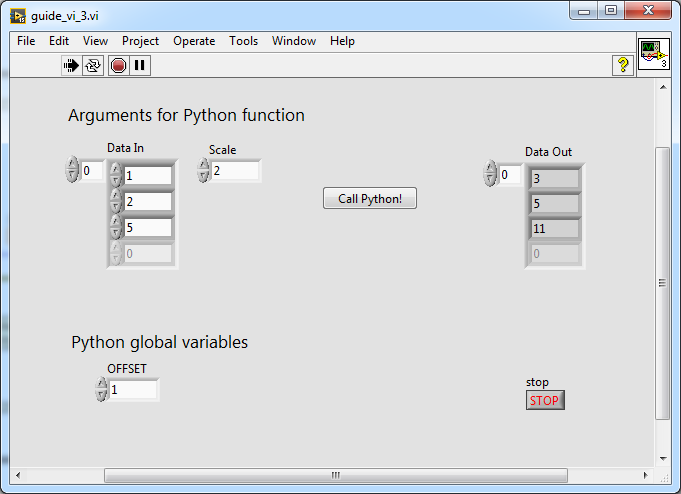
Changing the value of the Offset control will change the value of our OFFSET variable in Python. And, we can change the value of Data In and call the Python function repeatedly, on demand. So, rather than running a Python script that executes once and then exits, we've established an ongoing two-way conversation between LabVIEW and Python.
One last thing... you'll notice that we didn't get a Python window when running the example. That's because the Python console is hidden by default. You can control this via an input to New Session: