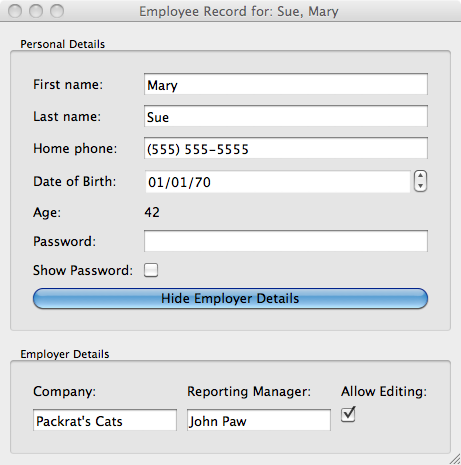
This tutorial shows how we can build more complex and dynamic user interfaces based on Enaml. It introduces the concepts of constraints and validators. It sets up a GUI to edit employee details.
Here is the Enaml file (download here):
#------------------------------------------------------------------------------
#  Copyright (c) 2011, Enthought, Inc.
#  All rights reserved.
#------------------------------------------------------------------------------
from enaml.layout.api import vertical, horizontal, align, spacer, vbox
from enaml.widgets.api import (
    Window, Label, Field, Form, DateSelector, CheckBox, GroupBox, Container,
    PushButton
)

from phone_validator import PhoneNumberValidator


enamldef EmployeeForm(Form):
    attr employee
    attr show_employer: bool = True
    Label:
        text = "First name:"
    Field:
        text := employee.first_name
    Label:
        text = "Last name:"
    Field:
        text := employee.last_name
    Label:
        text = "Home phone:"
    Field:
        validator = PhoneNumberValidator()
        text << '(%s) %s-%s' % employee.phone
        text ::
            match = validator.proper.match(text)
            if match:
                area = match.group(1)
                prefix = match.group(2)
                suffix = match.group(3)
                employee.phone = tuple(map(int, (area, prefix, suffix)))
    Label:
        text = 'Date of Birth:'
    DateSelector:
        date := employee.dob
    Label:
        text = 'Age:'
    Label:
        text << str(employee.age)
    Label:
        text = 'Password:'
    Field:
        echo_mode << 'password' if not pw_cb.checked else 'normal'
        text :: print 'Password:', text
    Label:
        text = 'Show Password:'
    CheckBox: pw_cb:
        checked = False
    PushButton:
        checked := show_employer
        checkable = True
        text << ('Hide' if show_employer else 'Show') + ' Employer Details'


enamldef EmployerForm(Form):
    attr employer
    Label:
        text = "Company:"
    Field:
        text << employer.company_name
        enabled << en_cb.checked
    Label:
        text = "Reporting Manager:"
    Field:
        text << "%s %s" % (employer.first_name, employer.last_name)
        enabled << en_cb.checked
    Label:
        text = "Allow Editing:"
    CheckBox: en_cb:
        checked = True


enamldef EmployeeView(Window): main:
    attr employee
    title << "Employee Record for: %s, %s" % (employee.last_name,
                                              employee.first_name)
    Container:
        constraints << [
            vertical(
                top, top_box, btm_box.when(btm_box.visible), spacer, bottom
            ),
            horizontal(left, spacer.flex(), top_box, spacer.flex(), right),
            horizontal(left, spacer.flex(), btm_box, spacer.flex(), right),
            align('midline', top_form, btm_form),
        ]
        GroupBox: top_box:
            share_layout = True
            title = "Personal Details"
            EmployeeForm: top_form:
                share_layout = True
                # We access the employee object through the identifier
                # 'main' here, because the EmployeeForm also has an
                # 'employee' attribute declared, and that would be
                # found first.
                employee = main.employee
        GroupBox: btm_box:
            share_layout = True
            title = "Employer Details"
            visible << top_form.show_employer
            EmployerForm: btm_form:
                share_layout = True
                employer << employee.boss
Here is the Python code (download here):
#------------------------------------------------------------------------------
#  Copyright (c) 2011, Enthought, Inc.
#  All rights reserved.
#------------------------------------------------------------------------------
import datetime

from traits.api import HasTraits, Str, Int, Instance, Tuple, Date, Property

import enaml
from enaml.stdlib.sessions import show_simple_view


class Person(HasTraits):
    """ A simple class representing a person object.

    """
    # The last name of the person as a string
    last_name = Str

    # The first name of the person as a string
    first_name = Str

    # The date of birth of the person
    dob = Date(datetime.date(1970, 1, 1))

    # The age of the person computed from their dob
    age = Property(Int, depends_on='dob')

    # This method is called when the age of the person needs to
    # be computed
    def _get_age(self):
        today = datetime.date.today()
        dob = self.dob
        age = today.year - dob.year
        birthday_this_year = dob.replace(year=today.year)
        if today < birthday_this_year:
            age -= 1
        return age


class Employer(Person):
    """ An employer is a person who runs a company.

    """
    # The name of the company
    company_name = Str


class Employee(Person):
    """ An employee is person with a boss and a phone number.

    """
    # The employee's boss
    boss = Instance(Employer)

    # The employee's phone number as a tuple of 3 ints
    phone = Tuple(Int, Int, Int)

    # This method is called automatically by traits to get the
    # default value for the phone number.
    def _phone_default(self):
        return (555, 555, 5555)

    # This method will be called automatically by traits when the
    # employee's phone number changes
    def _phone_changed(self, val):
        print 'received new phone number for %s: %s' % (self.first_name, val)


if __name__ == '__main__':
    # Create an employee with a boss
    boss_john = Employer(
        first_name='John', last_name='Paw', company_name="Packrat's Cats"
    )
    employee_mary = Employee(
        first_name='Mary', last_name='Sue', boss=boss_john
    )

    # Import our Enaml EmployeeView
    with enaml.imports():
        from employee_view import EmployeeView

    # Create a view and show it.
    view = EmployeeView(employee=employee_mary)
    show_simple_view(view)
This block summarizes most of the concepts seen in the previous tutorial. It creates a new enamldef based on the Form widget. Two attributes are exposed in the widget: an employee attribute and a show_employer boolean value that defaults to True. The form itself contains a set of Label widgets with associated Field widgets.
The "Home phone:" field must be validated to make sure the user can’t insert a phone number that is not valid. The user interface must also signal the user when the current entry is invalid.
A PhoneNumberValidator class implements the validate(...) method of the Validator abstract class. If the validation succeeds the returned value of the validate call is standardized formatted text.
#------------------------------------------------------------------------------
#  Copyright (c) 2012, Enthought, Inc.
#  All rights reserved.
#------------------------------------------------------------------------------
import re

from enaml.validation.api import Validator


class PhoneNumberValidator(Validator):
    """ A really dumb phone number validator.

    """
    all_digits = re.compile(r'[0-9]{10}$')

    dashes = re.compile(r'([0-9]{3})\-([0-9]{3})\-([0-9]{4})$')

    proper = re.compile(r'\(([0-9]{3})\)\ ([0-9]{3})\-([0-9]{4})$')

    def validate(self, text, component):
        match = self.proper.match(text) or self.dashes.match(text)
        if match:
            area = match.group(1)
            prefix = match.group(2)
            suffix = match.group(3)
            formatted_text = '(%s) %s-%s' % (area, prefix, suffix)
            return formatted_text, True
        match = self.all_digits.match(text)
        if match:
            area = text[:3]
            prefix = text[3:6]
            suffix = text[6:10]
            formatted_text = '(%s) %s-%s' % (area, prefix, suffix)
            return formatted_text, True
        return text, False
In the Field definition, every time the text is updated with a properly validated entry, the employee phone attribute is updated.
Field:
    validator = PhoneNumberValidator()
    text << '(%s) %s-%s' % employee.phone
    text ::
        match = validator.proper.match(text)
        if match:
            area = match.group(1)
            prefix = match.group(2)
            suffix = match.group(3)
            employee.phone = tuple(map(int, (area, prefix, suffix)))
The widget attributes all support the special Enaml operators. One can thus assign the result of arbitrary Python code to interact with the status of the widget:
Label:
     text = 'Password:'
 Field:
     echo_mode << 'password' if not pw_cb.checked else 'normal'
     text :: print 'Password:', text
 Label:
     text = 'Show Password:'
 CheckBox: pw_cb:
     checked = False
In this example, the user can activate or deactivate the echo_mode of the password Field based on the state of another widget, the password CheckBox. The user can refer to the password CheckBox using the id of the widget.
Visibility is controled with the visible attribute of a widget. In the EmployeeMainView, the btm_box visibility is connected to the top_form.show_employer attribute. Enaml will take care of the related relayout issues. See the constraints section for more information.
The very same pattern is used in the EmployerForm to enable or disable a group of Field widgets baesd on a CheckBox.
Once you have created the components of your main view, you can assemble them using the differeent containers:
Those widgets take care of aranging the layout of the child widgets using a set of constraints. In this tutorial, the only one that defines constraints is the outer container:
Container:
    constraints << [
        vertical(
            top, top_box, btm_box.when(btm_box.visible), spacer, bottom
        ),
        horizontal(left, spacer.flex(), top_box, spacer.flex(), right),
        horizontal(left, spacer.flex(), btm_box, spacer.flex(), right),
        align('midline', top_form, btm_form)
    ]
The constraints attribute of the Container is populated with a list of constraints. The user expresses how he wants the layout to be aranged:
- a vertical constraint on the widgets named by id’s.
- two horizontal constraints on the widgets with spacers
- a special constraint on the two forms that aligns their midline, the line between the two columns of the form. Note that we refer to the id’s of the forms and not the ones of the GroupBox. GroupBoxes do not have a midline attribute.
Using spacer, you can add empty space between widgets. This space could either be fixed space or flexible when using spacer.flex(). In this case, the spacer will expose a weaker preference for being the fixed value. The following set of constraints will make the first form compressed horizontally by setting the target fixed size of the spacer to 50 pixels:
Container:
    constraints << [
        vertical(
            top, top_box, btm_box.when(btm_box.visible), spacer, bottom
        ),
        horizontal(left, spacer(50).flex(), top_box, spacer(50).flex(), right),
        horizontal(left, spacer.flex(), btm_box, spacer.flex(), right),
        align('midline', top_form, btm_form)
    ]
Specialized containers can expose particular ways of managing their layout. The Form exposes a midline attribute that can be used to align the midline of different forms together. If it was not activated, the layout would have been:
Enaml provides many different ways of tweaking the constraints to make sure the layout engine gives you exactly what you want.
A user can give a weight to each constraint. Valid weights are: 'weak', 'medium', 'strong' and 'ignore'. If the user wants to make the width of the container equal to 233 pixels but with some latitude, he could add the following constraint:
Container:
    constraints << [
        vertical(
            top, top_box, btm_box.when(btm_box.visible), spacer, bottom
        ),
        horizontal(left, spacer.flex(), top_box, spacer.flex(), right),
        horizontal(left, spacer.flex(), btm_box, spacer.flex(), right),
        align('midline', top_form, btm_form),
        (width == 233) | 'weak'
    ]
The Container exposes some content related attributes to the constraints system: width, height, left, right, bottom, top, v_center and h_center. They can be used as shown in the previous example.
Depending on the flexiblity you need, you might want to use some of the other layout function like hbox or vbox. You could have created a layout pretty close to this one with the following constraints:
Container:
    constraints = [
        vbox(top_box, btm_box.when(btm_box.visible)),
        align('midline', top_form, btm_form)
    ]
The advantage of using hbox and vbox is that you can nest them. The vertical and horizontal functions cannot be nested.
The set of constraints can be nested by using the hbox, vbox or by providing constraints of containers that belongs to the outer container. The GroupBox provides some internal constraints regarding its size to allow the title to be properly displayed. A Form automatically lays out the widgets in two columns. If the user wanted to have an EmployerForm laid out in two horizontal rows in place of two columns, he could have edited the EmployerForm with the following set of changes:
enamldef EmployerForm(Container):
    attr employer
    constraints = [
        vbox(
            hbox(cmp_lbl, mng_lbl, edit_lbl),
            hbox(cmp_fld, mgn_fld, en_cb),
        ),
        cmp_lbl.width == cmp_fld.width,
        mng_lbl.width == mgn_fld.width,
        edit_lbl.width == en_cb.width,
    ]