Advanced Scripting with Mayavi
As elaborated in the An overview of Mayavi section, Mayavi can be scripted from Python in order to visualize data. Mayavi was designed from the ground up to be highly scriptable. Everything that can be done from the user interface can be achieved using Python scripts. Scripting the Mayavi2 application is a great way to add domain-specific functionality to the existing framework. In addition, understanding this application can help you design your own applications using Mayavi as powerful visualization library.
If you are not looking to script the Mayavi2 application itself or to build an application, but looking for quick ways to get your visualization done with simple code you may want to check out Mayavi’s mlab module. This is described in more detail in the mlab: Python scripting for 3D plotting section. In addition to this Mayavi features an automatic script recording feature that automatically writes Python scripts for you as you use the GUI. This is described in more detail in the Recording Mayavi actions to a script chapter. This is probably the easiest and most powerful way to script Mayavi.
However, to best understand how to script Mayavi, a reasonable understanding of the Mayavi internals is necessary. The following sections provide an overview of the basic design and objects in the Mayavi pipeline. Subsequent sections consider specific example scripts that are included with the Mayavi sources that illustrate the ideas.
Mayavi uses Traits and TVTK internally. Traits in many ways changes the way we program. So it is important to have a good idea of Traits in order to understand Mayavi’s internals. If you are unsure of Traits it is a good idea to get a general idea about Traits now. Trust me, your efforts learning Traits will not be wasted!
Design Overview: Mayavi as a visualization framework
This section provides a brief introduction to Mayavi’s internal architecture.
The “big picture” of a visualization in Mayavi is that an Engine
(mayavi.engine.Engine) object manages the entire
visualization. The Engine manages a collection of Scene
(mayavi.core.scene.Scene) objects. In each Scene, a
user may have created any number of Source
(mayavi.core.source.Source) objects. A Source
object can further contain any number of Filter
(mayavi.core.filter.Filter) or ModuleManager
(mayavi.core.module_manager.ModuleManager) objects. A
Filter may contain either other filters or ModuleManagers. A
ModuleManager manages any number of Modules. The figure below
shows this hierarchy in a graphical form.
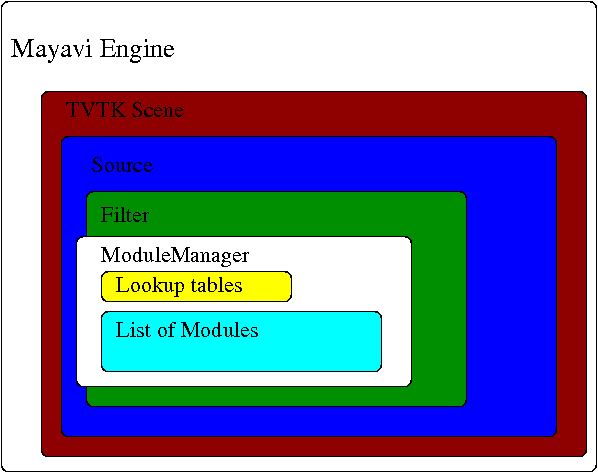
Illustration of the various objects in the Mayavi pipeline.
This hierarchy is precisely what is seen in the Mayavi tree view on the UI. The UI is therefore merely a graphical representation of this internal world-view. A little more detail on these objects is given below. For even more details please refer to the source code (hint: the source code of a class can be view in IPython by entering Class??).
Object-oriented construction of a visualization
When scripting Mayavi to create or modify a visualization, one mainly deals with adding or removing objects to the engine, or modifying their properties. We can thus rewrite the example of building a pipeline with mlab visited in Assembling pipelines with mlab by explicit calls to the engine:
import numpy as np
a = np.random.random((4, 4))
from mayavi.api import Engine
e = Engine()
e.start()
s = e.new_scene()
from mayavi.sources.api import ArraySource
src = ArraySource(scalar_data=a)
e.add_source(src)
from mayavi.filters.api import WarpScalar, PolyDataNormals
warp = WarpScalar()
e.add_filter(warp, obj=src)
normals = PolyDataNormals()
e.add_filter(normals, obj=warp)
from mayavi.modules.api import Surface
surf = Surface()
e.add_module(surf, obj=normals)
As with all Mayavi code, you need to have the GUI mainloop running to
have the visualization go live. To do this, type ipython --gui=qt in
a Terminal or Command Prompt.
This explicit, object-oriented, code thus mirrors the mlab.pipeline code. It is more fine-grained, and gives you more control. For instance it separates initialization of the objects, and their addition or removal to an engine. In general, it is more suited to developing an application, as opposed to a script.
Life-cycle of the different objects
All objects in the Mayavi pipeline feature start and stop
methods. The reasoning for this is that any object in Mayavi is not
usable (i.e. it may not provide any outputs) unless it has been
started. Similarly the stop method “deactivates” the object.
This is done because Mayavi is essentially driving VTK objects
underneath. These objects require inputs in order to do anything
useful. Thus, an object that is not connected to the pipeline cannot
be used. For example, consider an IsoSurface module. It requires
some data in order to contour anything. Thus, the module in isolation
is completely useless. It is usable only when it is added to the
Mayavi pipeline. When an object is added to the pipeline, its inputs
are setup and its start method is called automatically. When the
object is removed from the pipeline its stop method is called
automatically. Note that if you are looking to remove an object from
the mayavi pipeline, you can use the remove method to do so. For
example (the following will require that you use ipython –gui=qt):
>>> from mayavi.api import Engine
>>> e = Engine()
>>> e.start()
>>> s = e.new_scene()
>>> from mayavi.sources.api import ParametricSurface
>>> p = ParametricSurface()
>>> e.add_source(p) # calls p.start internally.
>>> p.remove() # Removes p from the engine.
Apart from the Engine object, all other objects in the Mayavi
pipeline feature a scene trait which refers to the current
tvtk.pyface.tvtk_scene.TVTKScene instance that the
object is associated with. The objects also feature an add_child
method that lets one build up the pipeline by adding “children”
objects. The add_child method is “intelligent” and will try to
appropriately add the child in the right place based on the context.
Scripting the mayavi2 application
The mayavi2 application is implemented in the
mayavi.scripts.mayavi2 module (look at the
mayavi2.py file and not the mayavi2 script). This code
handles the command line argument parsing and runs the application.
mayavi2 is an Envisage application. It starts the Envisage
application in its main method. The code for this is in the
mayavi.plugins.app module. Mayavi uses several envisage plugins
to build up its functionality. These plugins are defined in the
mayavi.plugins.app module. In this module there
are two functions that return a list of default plugins, get_plugins and the
get_non_gui_plugins. The default application uses the
former which produces a GUI that the user can use. If one uses the
latter (get_non_gui_plugins) then the mayavi tree view,
object editor and menu items will not be available when the
application is run. This allows a developer to create an application
that uses mayavi but does not show its user interface. An example of
how this may be done is provided in examples/mayavi/nongui.py.
Scripting from the UI
When using the mayavi2 application, it is possible to script from
the embedded Python interpreter on the UI. On the interpreter the name
mayavi is automatically bound to an
mayavi.plugins.script.Script instance that may be used to
easily script mayavi. This instance is a simple wrapper object that
merely provides some nice conveniences while scripting from the UI. It
has an engine trait that is a reference to the running mayavi
engine. Note that it is just as convenient to use an
Engine instance itself to script mayavi.
As described in The embedded Python interpreter section, one can always drag a mayavi pipeline object from the tree and drop it on the interpreter to script it directly.
One may select the File->Open Text File… menu to open an existing
Python file in the text editor, or choose the File->New Text File menu
to create a new file. The text editor is Python-aware and one may write
a script assuming that the mayavi name is bound to the Script
instance as it is on the shell. To execute this script one can press
Control-r as described earlier. Control-s will save the script.
Control-b increases the font size and Control-n reduces it.
The nice thing about this kind of scripting is that if one scripts
something on the interpreter or on the editor, one may save the
contents to a file, say script.py and then the next time this script
can be run like so:
$ mayavi2 -x script.py
This will execute the script for automatically. The name mayavi
is available to the script and is bound to the Script instance.
This is very convenient. It is possible to have mayavi execute
multiple scripts. For example:
$ mayavi2 -d foo.vtk -m IsoSurface -x setup_iso.py -x script2.py
will load the foo.vtk file, create an IsoSurface module, then
run setup_iso.py and then run script2.py.
There are several scripts in the mayavi examples directory that
should show how this can be done. The examples/README.txt
contains some information on the recommended ways to script.
Scripting from IPython
It is possible to script Mayavi using IPython. IPython will have to
be invoked with the --gui=qt command line option in order to allow
one to interactively script the mayavi application:
$ ipython --gui=qt
To start a visualization do the following:
from mayavi.plugins.app import main
# Note, this does not process any command line arguments.
mayavi = main()
# 'mayavi' is the mayavi Script instance.
It is also possible to use mlab (see mlab: Python scripting for 3D plotting) for this purpose:
from mayavi import mlab
f = mlab.figure() # Returns the current scene.
engine = mlab.get_engine() # Returns the running mayavi engine.
With this it should be possible to script Mayavi just the way it is done on the embedded interpreter or on the text editor.
An example
Here is an example script that illustrates various features of scripting
Mayavi (note that this will work if you execute the following from the
embedded Python shell inside Mayavi or if you run it as mayavi2 -x
script.py):
# Create a new mayavi scene.
mayavi.new_scene()

# Get the current active scene.
s = mayavi.engine.current_scene

# Read a data file.
d = mayavi.open('fire_ug.vtu')

# Import a few modules.
from mayavi.modules.api import Outline, IsoSurface, Streamline

# Show an outline.
o = Outline()
mayavi.add_module(o)
o.actor.property.color = 1, 0, 0 # red color.

# Make a few contours.
iso = IsoSurface()
mayavi.add_module(iso)
iso.contour.contours = [450, 570]
# Make them translucent.
iso.actor.property.opacity = 0.4
# Show the scalar bar (legend).
iso.module_manager.scalar_lut_manager.show_scalar_bar = True

# A streamline.
st = Streamline()
mayavi.add_module(st)
# Position the seed center.
st.seed.widget.center = 3.5, 0.625, 1.25
st.streamline_type = 'tube'

# Save the resulting image to a PNG file.
s.scene.save('test.png')

# Make an animation:
for i in range(36):
    # Rotate the camera by 10 degrees.
    s.scene.camera.azimuth(10)

    # Resets the camera clipping plane so everything fits and then
    # renders.
    s.scene.reset_zoom()

    # Save the scene.
    s.scene.save_png('anim%d.png'%i)
Sometimes, given a Mayavi Script instance or Engine, it is
handy to be able to navigate to a particular module/object. In the
above this could be achieved as follows:
x = mayavi.engine.scenes[0].children[0].children[0].children[-1]
print(x)
In this case x will be set to the Streamline instance that we
just created.
There are plenty of examples illustrating various things in the
examples/mayavi directory. These are all fairly well documented.
In particular, the standalone.py example illustrates how one can
script mayavi without using the envisage application at all. The
offscreen.py example illustrates how this may be done using off
screen rendering (if supported by your particular build of VTK).
examples/README.txt contains some information on the recommended
ways to script and some additional information.
Using the Mayavi envisage plugins
The Mayavi-related plugin definitions to use are:
mayavi_plugin.py
mayavi_ui_plugin.py
These are in the mayavi.plugins package. To see an
example of how to use this see the mayavi.plugins.app
module. The explorer3D example in examples/mayavi/explorer also
demonstrates how to use Mayavi as an envisage plugin.
If you are writing Envisage plugins for an application and desire to use the Mayavi plugins from your plugins/applications then it is important to note that Mayavi creates three workbench service offers for your convenience. These are:
mayavi.plugins.script.Script: This is anmayavi.plugins.script.Scriptinstance that may be used to easily script mayavi. It is a simple wrapper object that merely provides some nice conveniences while scripting from the UI. It has anenginetrait that is a reference to the running Mayavi engine.
mayavi.core.engine.Engine: This is the running Mayavi engine instance.
A simple example that demonstrates the use of the Mayavi plugin in an
envisage application is included in the examples/mayavi/explorer
directory. This may be studied to understand how you may do the same
in your envisage applications.