Data Import Tool Commands
A command refers to a single data manipulation task – from renaming a column to deleting rows based on a condition. The tool provides a set of commands to perform actions like these easily, as well as record them as Python / Pandas code to be exported later. Every command is completely reversible, so don’t be afraid to try them! As commands are executed they are logged in the command history. This allows you to see the exact steps that have been taken while you transform your data. Commands in the command history can be reordered, enabled and disabled, or removed. These operations can be done to a command at any point in the history and the other commands in the history will be reverted and re-executed accordingly to ensure that all commands are performed correctly.
In the UI, the user can access the commands either through the Transform list in the menubar or by right-clicking a table element (such as row/s, column/s, or cell/s).
Read Data Command
The Read Data command is the one command that users do not issue themselves, but has a number of important options that can be adjusted to change how the data is initially read in. For this reason, we’ve given the command its own section.
This command is the first command that gets executed as the tool loads the requested data. If you’re importing data from a file (excluding HTML files) or from the clipboard, the Edit Command pane for this command provides the user these options:
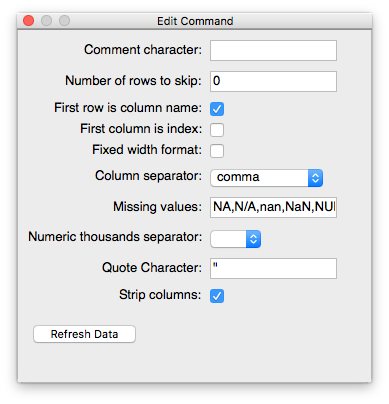
- Fixed width format - Is this data tabular with fixed-width columns?
- First row is column name - Does the first row contain column headers? This line specified is the first line not including comment lines (see Comment character), empty lines in the data, or skipped lines (see Number of rows to skip). More simply, use the first line of valid data from the input.
- Column separator - What separates the data horizontally (e.g., commas, whitespace)?
- Comment character - Remainder of line following this character will be removed.
- Number of rows to skip - Number of lines in the raw data that are skipped before attempting to parse the data’s layout and content.
Missing values - These values (comma separated) are interpreted as missing/null values and represented as such when importing (e.g., “N/A” or “-999”)
Note
The Data Import Tool assumes the following values as Missing Values by default -
NA,nan,NaN,NULL,''.
If you are loading data from an HTML file, the tool will handle the incoming data differently, by searching for embedded tables in the web page. The Edit Command pane for this HTML case contains four options. Apart from the Number of rows to skip and First row is column name parameters defined earlier, the Match String and Table index on page parameters can be used to key in on a specific table if multiple tables are detected on the page by the Tool. The Tool will load the first table on the page by default and the user can select a different table by entering some text that is unique the table they want, or by entering the index of the table on the page.
Transform Menu Commands
Join Columns - Create a new column by joining two or more existing columns. This will concatenate the values from the source columns separated by the specified Delimiter character(s). This command is also available in the column header right-click menu after making a multi-column selection. The new column will be inserted to the right of the right-most selected column.
Note
If the columns being joined contain null values, the Data Import Tool will by default replace them with empty strings in the new column. For example, joining columns with values
null,99,nullwill produce the result-99-. The user can choose to replace the null values with a string of their choice by setting theReplace null values with:option in the dialog.
Insert Column - Insert a new column (at column position 0) using the supplied Python expression (see Entering Expressions). This action is also available inside a header’s right-click menu, which will insert the column to the left of the selected column.
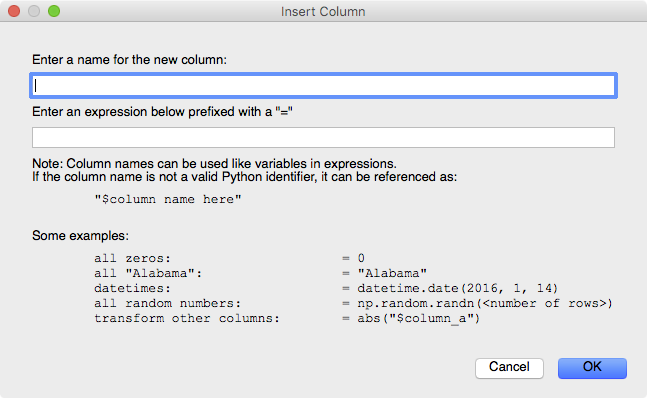
Figure 1. Insert Column Dialog
Delete Empty Rows - Delete all rows that contain a Null value or Delete all rows that only contain null values.
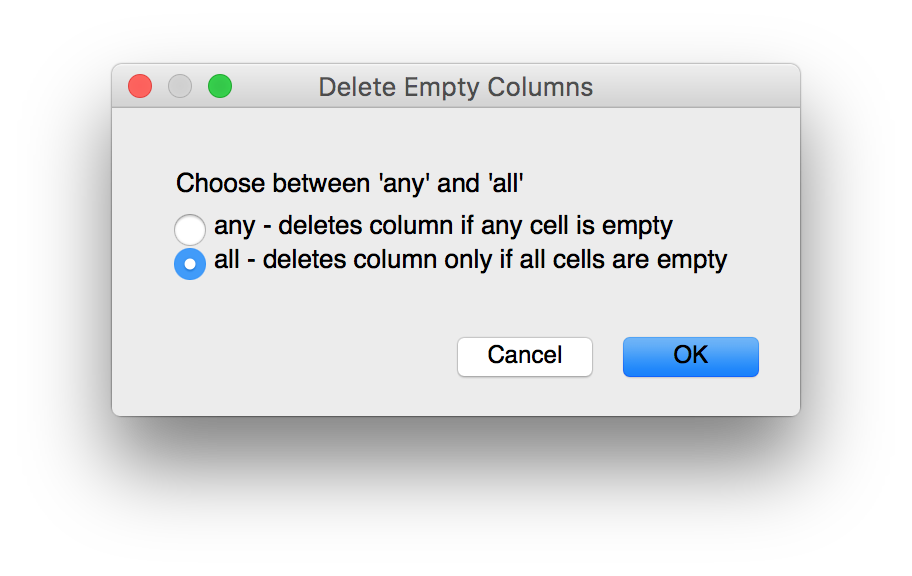
Delete Empty Columns - Delete all columns that contain a Null value or Delete all columns that only contain null values.
- Delete Rows Where... - Delete all rows that satisfy the supplied boolean expression (see Entering Expressions).
Column Header Commands
By right-clicking a column header, the user can choose to Rename, Delete, or Duplicate the selected column, in addition to the following commands:
Convert - Convert the data type for the column. Available types are
float,int,string,datetime, andbool.Note
When converting between certain column data types, the tool may take steps to prevent errors in Pandas. For example, trying to convert a column containing null values into an
int,datetime, orbooltype column will show the desired result in the tool’s display, however, in the exported Pandas DataFrame, the column will be of typefloatdue to the underlying representation of null values.Fill Missing Values - Fill existing Null values with either a user-supplied value, the value in the cell above the missing value, or the value in the cell below.
Set as Index - Set the column’s values to be the new index labels for the table.
Warning
Setting a column containing non-unique values as the index is not allowed. This is done to prevent unexpected behavior when using commands that rely on the labels, such as Delete Rows.
Split - Split the column based on a user-specified
Delimiter. The Tool will automatically name the resultant columns asoriginal_column_name_split_{i}, whereigoes from0to the total number of resultant columns.Format Display - Use standard Python string formatting to format the columns values, where
{ }represents the current value.
- Demote Header to Row - Move the values currently contained in the column headers into top row of the table data. The new column headers will be set to integer values over the range of columns.
- Insert Column - Insert a column to the left of the clicked column using the supplied Python expression (see Entering Expressions).
You can also sort a column’s values (independently of other columns) by clicking on the up-down sort indicator arrows to the far right side of a column header. Clicking on the up triangle will sort the values in ascending order and clicking on the down triangle will sort in descending order. Clicking on an already sorted column will toggle between ascending and descending sort order.
Sorting also preserves any existing order in the DataFrame.
Each sort action is registered as a single command, so the user should remove any unnecessary sort commands in the history because they can be computationally expensive for large data sets. In the same manner, to undo the sorting on a column the user can use the Undo action (CTRL/CMD-Z) or delete the command from the history.
Note that changing the value of a cell in a sorted column will remove the sort indicator.
Cell Right-Click Menu Commands
Copy / Paste - Copy a single cell to either a single cell or a contiguous selection of cells. These commands also allow the user to select a contiguous block of cells and paste into another section of the table. The paste action will tile the copied section if the dimensions of the target range are integer multiples of the selected dimensions. Otherwise, the paste will copy the initial selection once, using the top-left cell as the anchor point.
The copy / paste functionality will also work when copying from an external source, such as Microsoft Excel or a table in a webpage.

Figure 2. Copy / Paste Functionality
Set as Null - Sets the selected cell(s) to the Null value for that column’s data type.
Mark all occurrences as Null - In the current column, mark all occurrences of this value as Null.
Entering Expressions
When performing certain commands, like Insert Column, the user is prompted to
enter an expression to be used when populating new fields. The expression has
to be a valid Python expression and can use column names as variables in the
expression. If the column name is not a valid Python identifier
(e.g., contains a space or starts with a number), it can be referenced as
"$column name here". Some examples:
- Enter all zeros:
= 0- Repeated string:
= "Texas"- Datetimes:
= datetime.date(2015, 10, 21)- All random numbers:
= np.random.randn(<number of rows in table>)- Use other columns:
= abs(OFFSET_COL)or=abs("$Column A")
Vectorized String Methods
Because the Data Import Tool is built on top of Pandas, we can use vector string methods to manipulate column data. For example, together with Transform Menu Commands, we can:
- Convert all entries in column to lower case using
= {"$Column A"}.str.lower()- Strip leading or trailing white spaces using
= {"$Column A"}.str.strip()- Replace an underscore with a whitespace using
= {"$Column A"}.str.replace('_',' ')
For more information, we refer you to the Vectorized String Methods and Working with Text Data sections of the Pandas Documentation.
Command History
Commands in the command history can be enabled, disabled, or removed. These operations can be done to a command at any point in the history and the other commands in the history will be reverted and re-executed accordingly to ensure that all commands are performed correctly within certain limitations. For example, disabling or deleting a command that inserts a new column, on which a subsequent command depends on, will prevent that subsequent command for being applied successfully. The user will see that such failed commands are highlighted in red.