Deploying Python-Powered LabVIEW Applications
The typical workflow for developing a LabVIEW application involves running your code (and the Toolkit) on a computer with the full LabVIEW development environment installed. But not all programs have to be developed this way. LabVIEW ships with an advanced set of tools for preparing "deployable" applications, which don't require the full LabVIEW Development Environment to function.
There are two common workflows for using the Python Integration Toolkit with LabVIEW's Application Builder. They differ mainly in the way in which Python is delivered to the target system.
With simple deployment, your LabVIEW program is bundled up along with the Toolkit VIs, and deployed on a machine that already has Python installed.
With advanced deployment, your LabVIEW program is bundled up along with the Toolkit VIs and a complete, standalone copy of Python which includes all of your dependencies. This makes it easy to build single-step installers, rather than installing Python separately on the target system. A deployment tool is provided with the Toolkit which can bundle up Enthought-delivered Python packages to ship inside the installer.
See Deployment Licensing for important information about deploying apps using the Toolkit in this way.
Note
Example VIs and projects configured for Application Builder are included in the Toolkit examples (Examples) under the "deployment_simple" and "deployment_advanced" folders.
Simple deployment
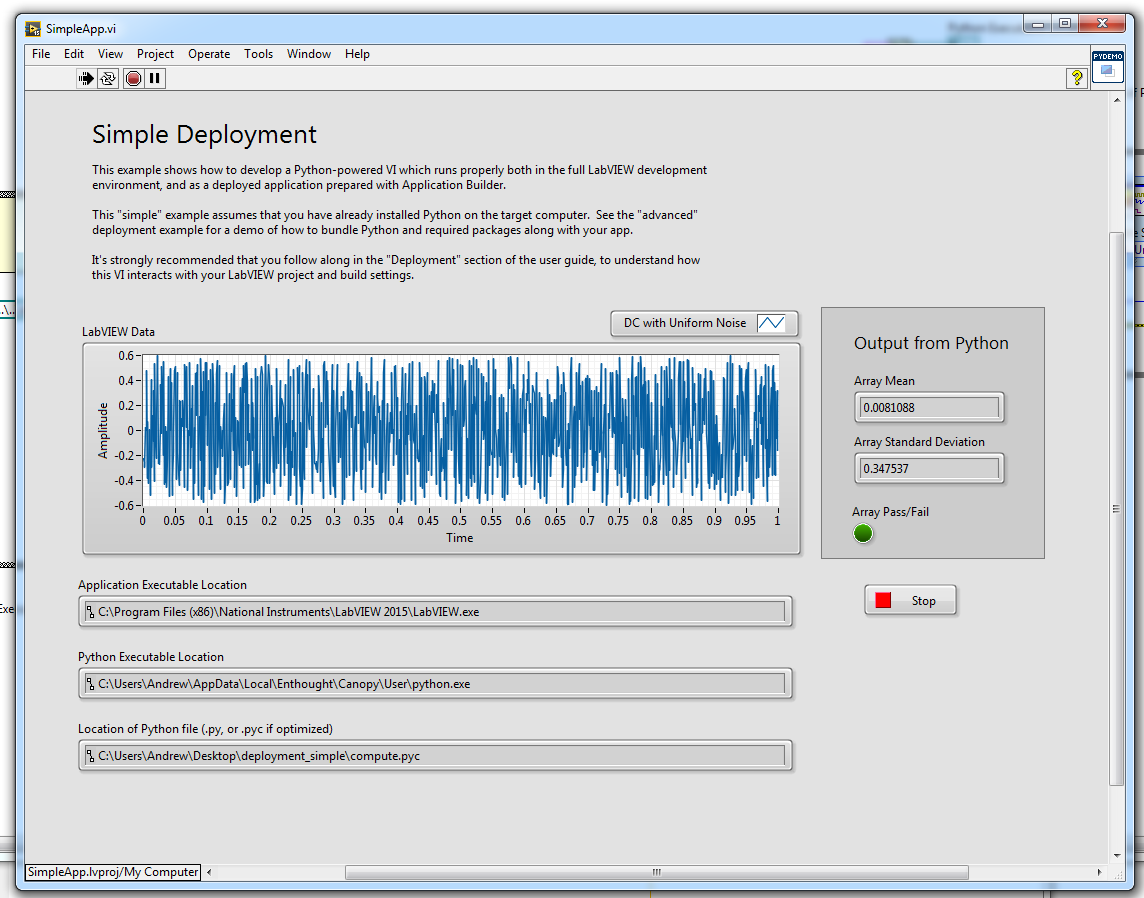
Let's suppose we have a VI we want to package with Application Builder. It
uses a Python script, compute.py, to do some simple analysis. Here's the
front panel of the example VI that ships with the Toolkit:
Writing the VI
The most important thing to remember is that
when running inside the deployed app, you must supply the path to both your Python module and Python itself.
You can do so by using a Property Node to check App.Kind:
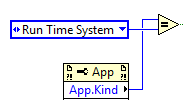
Typically, this check leads to a case structure where the appropriate paths are supplied to New Session based on whether the VI is running on the Development or Run Time system. Both the path to your Python module and the path to Python.exe must be handled in this way.
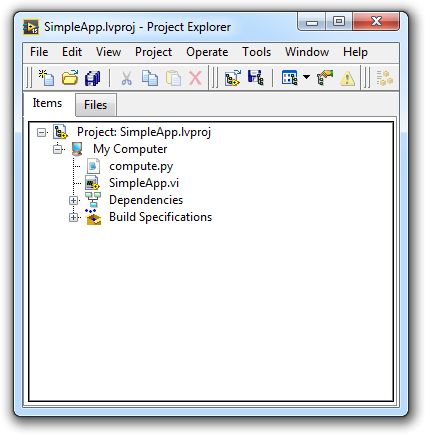
Setting up your project
Include all your VIs and Python source in a LabVIEW project. The "simple" deployment demo that ships with the Toolkit looks like this:
Building the application executable
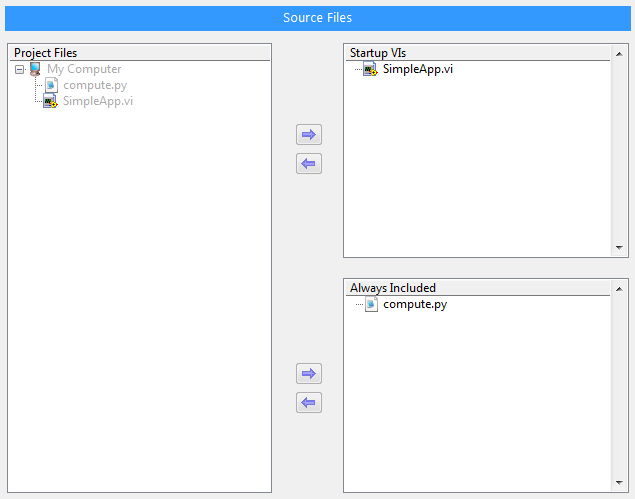
Right-click on Build Specifications and select New -> Application (exe).
There's a huge amount of configuration possible, but we'll focus on the bare
minimum needed to get your app running. Under the "Source Files" tab,
select your main VI and put it under "Startup VIs". Also, put your Python
module under "Always Included" so the build system will include it.
That's it! Click "Build", and LabVIEW will automatically pull in the Toolkit VIs and other dependencies. When it's done, the build output folder will look like this:
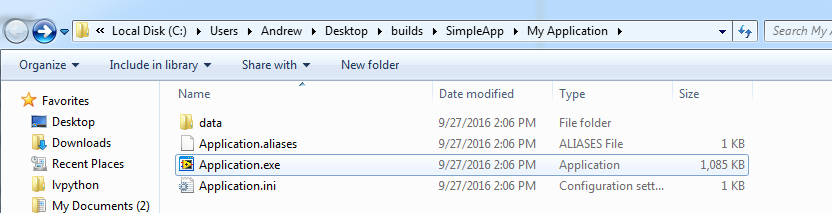
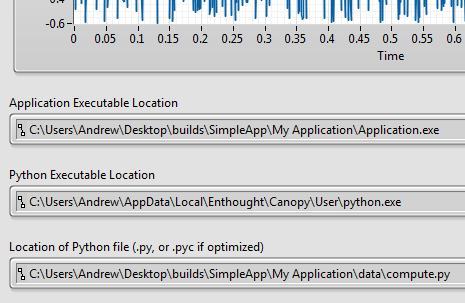
When we run Application.exe, take a close look at the indicators on the
front panel. Rather than "LabVIEW.exe", the program is now running from
"Application.exe", and the Python module is loaded from the "data" directory:
Building the installer
To run, this application needs Python on the target system, along with the
LabVIEW runtime. You can use Application Builder make an installer that
delivers the LabVIEW runtime. Right-click on Build Specifications again
and select New -> Installer.
The only setting we need to adjust here is to add our application under
"Source Files". Put the whole thing under [Program Files] -> SimpleApp:
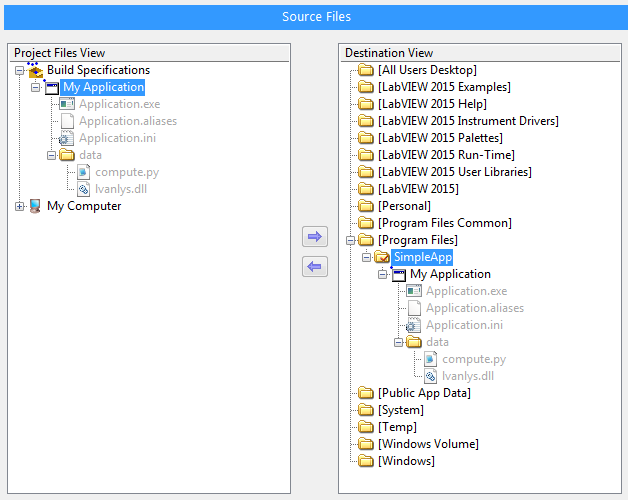
Click "Build", and the system will produce a Windows installer. Run it, and you should get a "SimpleApp" entry in Program Files. Now, the front panel paths look like this:
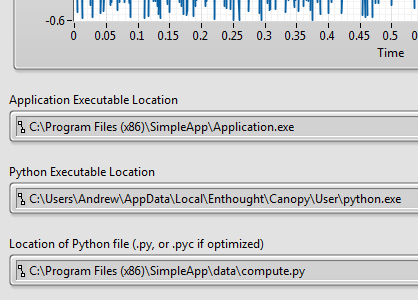
Everything is under "Program Files", except for Python, which is installed on the target system separately.
Advanced Deployment
The above steps work great, with the exception that Python (and all the packages) need to be separately installed on the target systems. Sometimes, this can be desireable... particularly if you have a highly customized Python installation that you want to set up in an unusual way.
For Enthought-delivered Python installations, like Enthought Canopy, the Toolkit ships with a "bundling" tool that allows you to easily pack up a stand-alone Python installation and include it in your application's installer. In other words, Python along with all required packages can be delivered to the target machine in one step.
Writing the VI
As before, we check whether the VI is running on the Development system, or on the Run Time system, and supply the appropriate paths for Python and our source module.
This time, though, in the Run Time System case structure the paths are different than before, and involve oddly-named directories like "Python Modules" and "Python Runtime":

Let's explore why.
Setting up your project
The "advanced" demo that ships with the Toolkit looks a lot like the "simple" demo, only there are some differences in how the project is laid out. Here's what the source looks like on disk:
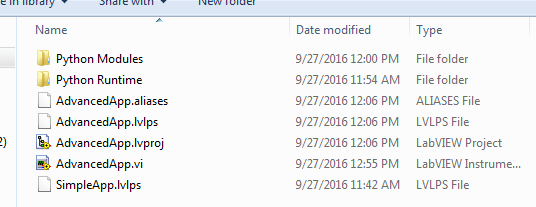
We still have our "main" VI, but instead of putting the compute.py module
right next to it, we've put it in a subfolder. We've also created an empty
folder called "Python Runtime".
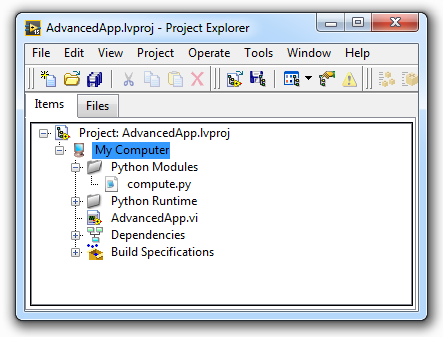
Here's what the project looks like... we've created virtual folders for
"Python Modules" and "Python Runtime", and added compute.py to the former:
Bundling Python
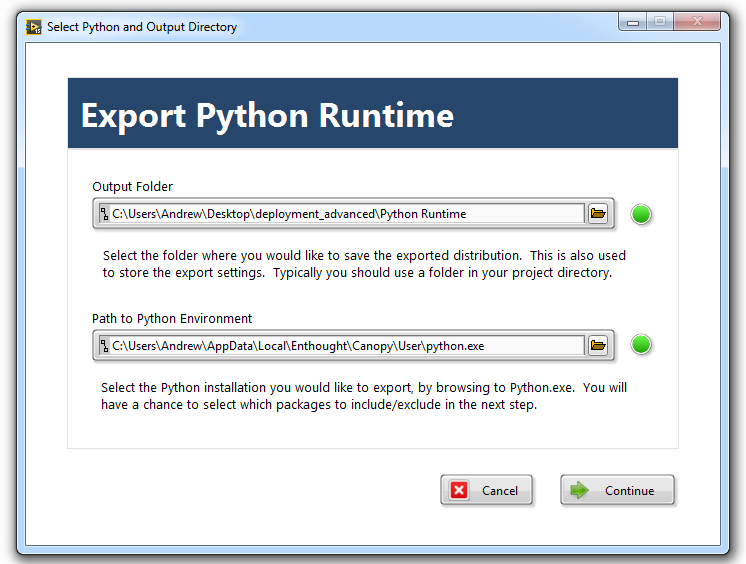
Launch the bundling tool via "Tools -> Python Integration Toolkit -> Bundle Python For Deployment...". For "Output Folder", select the "Python Runtime" folder in your source directory:
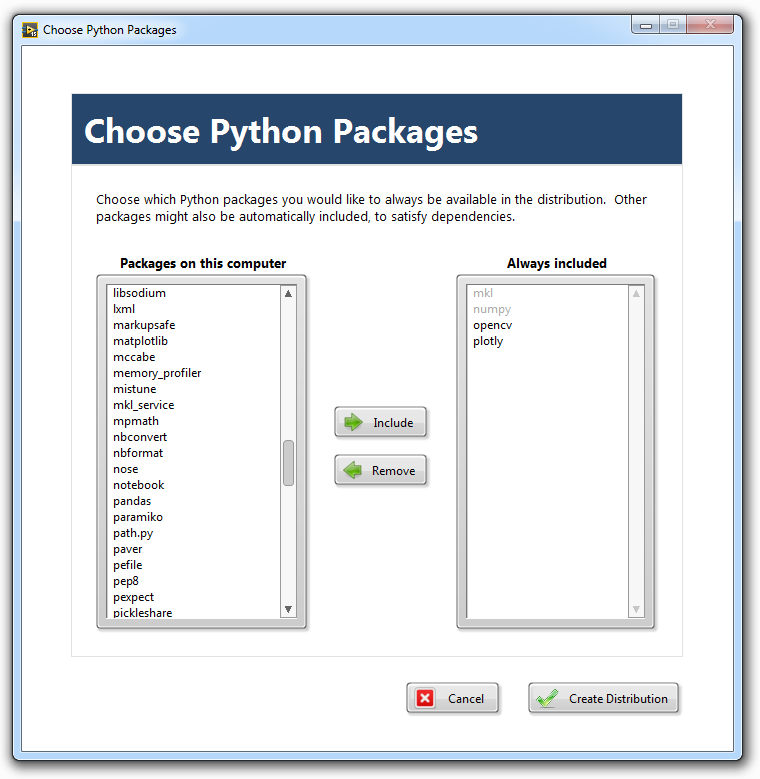
The Toolkit inspects the Python installation you've selected and finds all the Enthought-delivered packages inside. Select the ones you would like to include. Just select the "top-level" ones (the ones your app needs); packages that they depend on will be included automatically.
In this case, we've chosen to include the OpenCV machine-vision library, and the "Plotly" cloud-based plotting library:
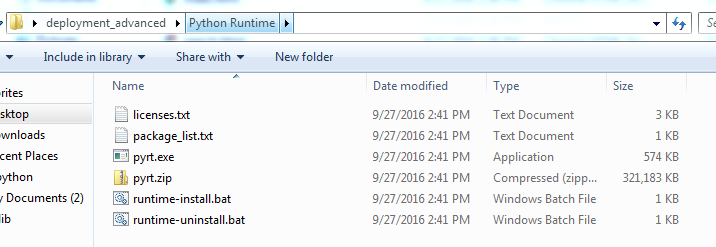
Click "Create Distribution" and a window will open setting up Python. When it's done, you should see the following in your "Python Runtime" folder:
Building the application executable
As before, create an "Application (exe)" build distribution. In the Source Files tab, be sure to include your main VI, and the two source directories:
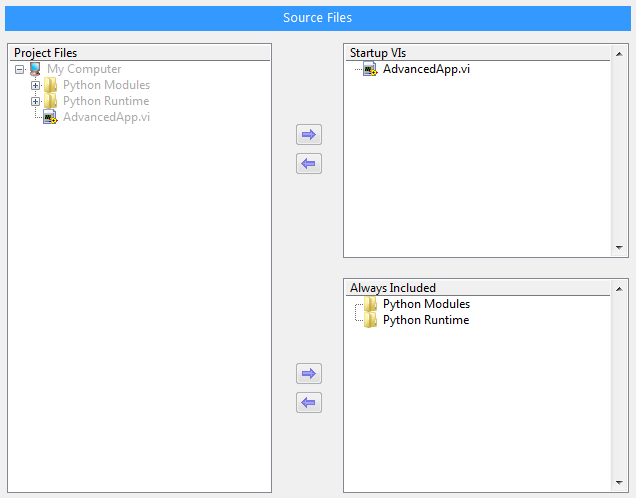
There's one important change we have to make. If we let LabVIEW put everything under "data" as it did before, things will be kind of a mess... we'll lose any folder structure for our Python modules, and the Python Runtime files will be all mixed in with the source code.
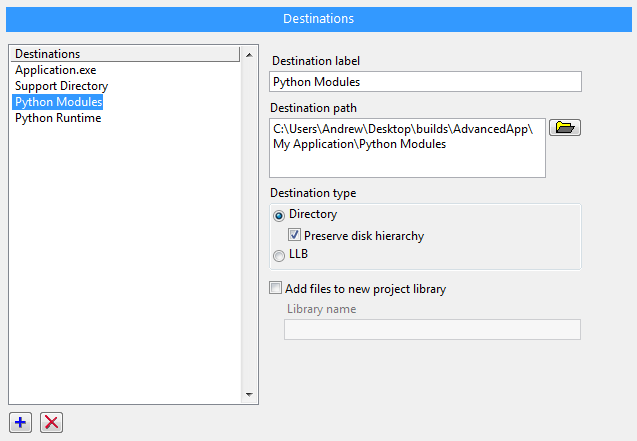
So, on the "Destinations" tab, we create two custom destinations, called "Python Modules" and "Python Runtime", and set them both to preserve the on-disk hierarchy of files:
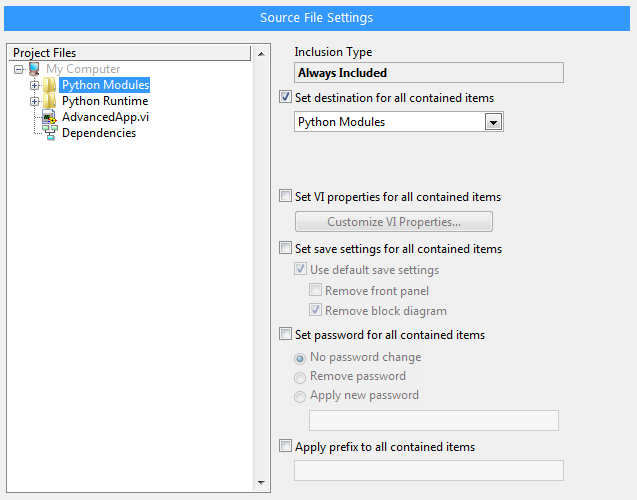
Then, on the "Source File Settings" tab, we tell LabVIEW to use these as the destination folders for the Python Modules and Python Runtime files in our source:
Building the installer
We'll build the installer in the same way as last time, with one change. On the "Advanced" tab, we'll ask that the installer run a couple of batch files: one when the app is installed, and one when the app is uninstalled. These will unpack the bundled Python runtime:
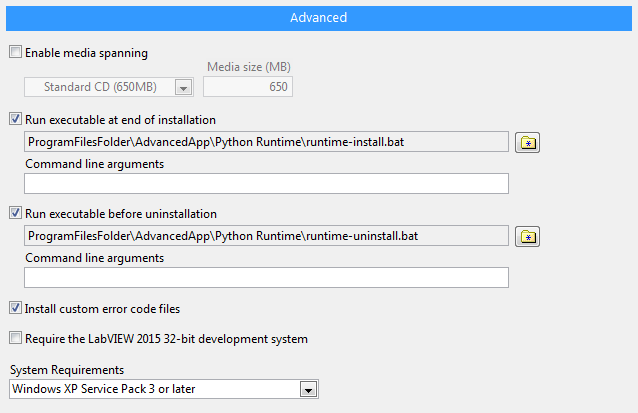
Build the installer and run it. You should get an "AdvancedApp" folder in the Start menu. Running the app, we see the paths on the front panel have changed once again:
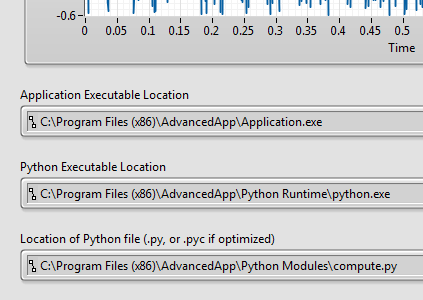
The application is now fully self-contained.
Deployment Licensing
Deployed applications necessarily include parts of the Python Integration Toolkit; additionally, apps using advanced deployment include Enthought's Python distribution and a number of third-party packages. The Toolkit end user license agreement covers redistribution and deployment.
To make it easy to get started, each Standard Edition toolkit license includes 3 seats for deployment within your organization. For most individual users, and many small groups, this gives plenty of flexibility out-of-the-box. For deployment outside your organization, or for additional deployment capability in-house please contact Enthought (info@enthought.com).