Code Editor, Python Shell, and File Browser
Canopy users spend most of their GUI time in this window. You can write Python code in the Code Editor, run your code in the Python pane or experiment line-by-line using IPython’s fast interactive help and discovery.
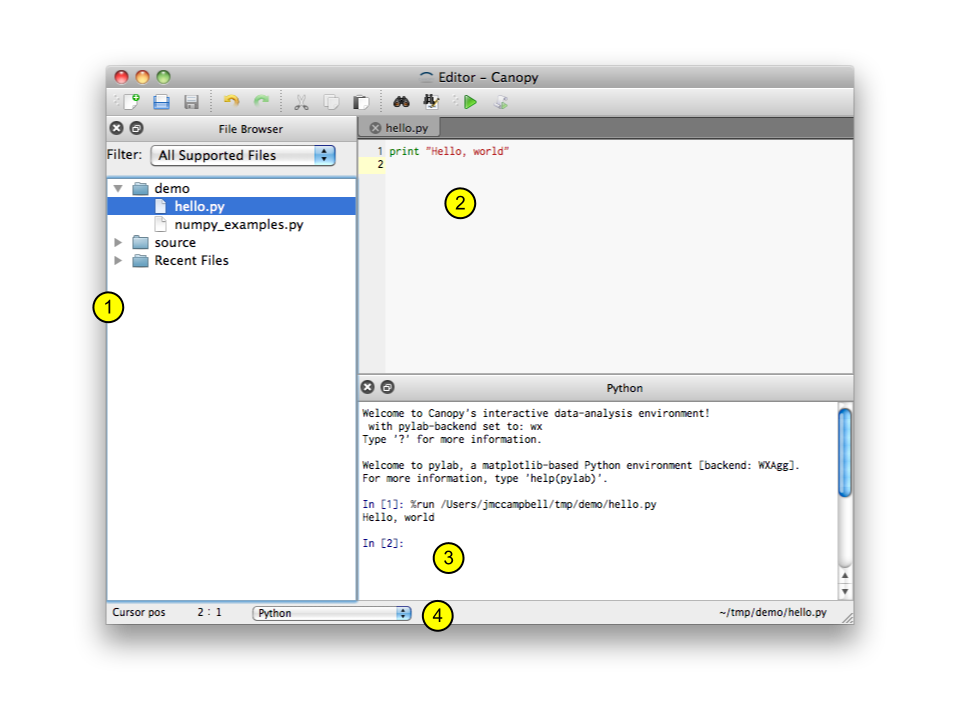
Please note these key pieces of the Code Editor (more details below):
1. File browser pane: shows one or more directories and any recently opened files. Double-click a file to open it in the Code Editor.
2. Code editor: a general purpose text-editor with additional features specifically for editing Python code.
3. Python pane: integrates an IPython (Interactive Python) prompt that lets you quickly test code, experiment with ideas, and run code directly from the editor.
4. Editor status bar: shows information about the the file currently displayed in the code editor: line and column (1 and 22, respectively, in the image above), file type, and file path and name.
The File Browser and Python panes can be dragged and dropped to different positions within a Code Editor window, or to outside its borders. When you are dragging a pane, the location where it would dock is highlighted in blue. These panes can also be hidden using their small “X” icon, or hidden/shown from the View menu.
The Canopy editor includes a graphical interactive debugger for Python programs. Using the debugger, you can run a script, pause its execution at specified breakpoints, and step through the code line by line. Whenever the program is paused, you can inspect variables and evaluate arbitrary expressions. Canopy’s debugger is tightly integrated with IPython’s debugger.
Canopy’s debugger also includes a variable browser for inspecting variables. The variable browser makes it quick and easy to inspect and modify variables in the current Python namespace, including complex objects such as NumPy arrays.
The Canopy debugger is available to all Canopy users who have logged into Canopy on the Welcome Screen. To authenticate your debugger access initially, you may need to log in again or restart Canopy while connected to the internet. If you subsequently go offline, you can continue using the debugger.
For additional information about Canopy’s Graphical Debugger see Canopy Debugger and Variable Browser.
Data Import Tool
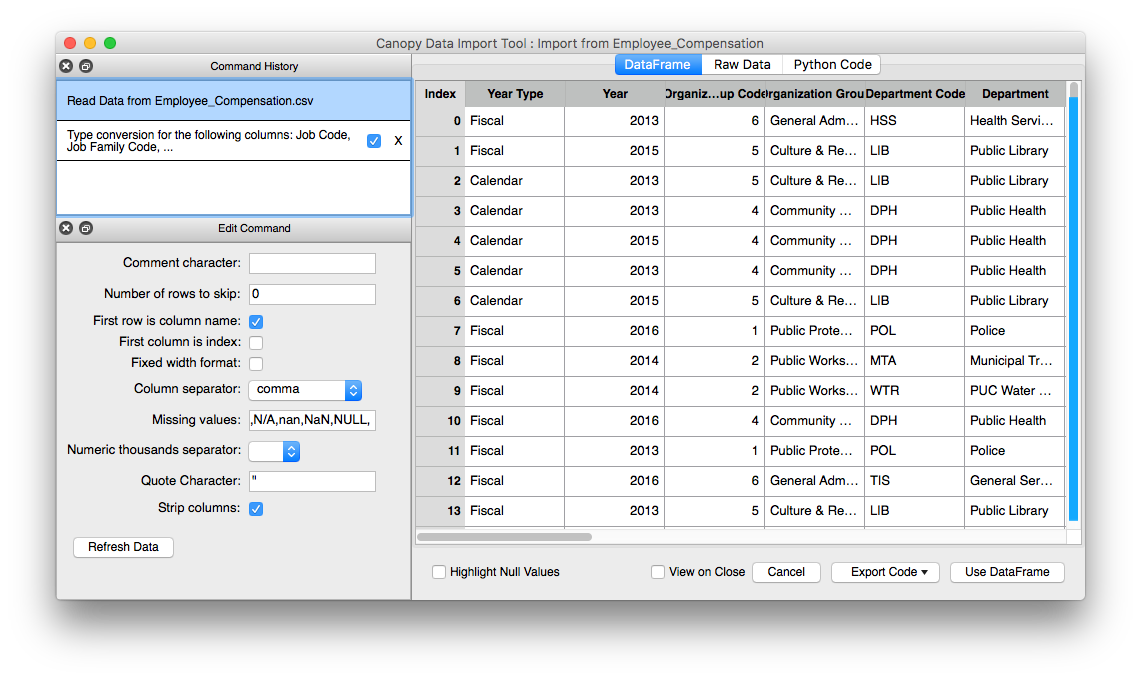
Canopy offers an interactive graphical Data Import Tool for Enthought deployment solution customers. This tool provides a streamlined way to import and manipulate text data files. Built atop the Pandas library, the Data Import Tool allows you to load data into and graphically interact with Pandas DataFrames, which can then be used within Canopy’s IPython sessions. Finally the actions used to load and manipulate the DataFrames can be exported as a python script which can be tweaked and/or re-used on similar input data.
Data Import Tool Features
- Integration with Pandas DataFrames
- Load common structured text files (csv, tsv, etc...)
- Load tabular data from URL
- Interactive graphical visualization and manipulation of DataFrames
- Add/Edit/Rename/Delete/Move/Join/Sort columns
- Handle NaN/missing data
- Swap between views of DataFrame and Raw Data
- View and save python code used to load and manipulate data
- Export DataFrame to csv or Excel file
- Import data for use in Canopy IPython session
- Autosave command history for loaded files for reproducibility when reloading files
For more information about the Data Import Tool please see the Online Documentation.
Code Editor Features
Choice of file type
The type of the current file is automatically determined based on the files extension (.py or .c for example) but can be manually changed by selecting a different type from the popup menu in the editor status bar. Changing the file type enables language-specific features, such as auto-completion of Python code and syntax highlighting for many languages.
As of Canopy 2.1, all .py files will be considered to be Python 2, but it
actually makes no difference whether you select Python 2 or Python 3 here.
Instead, the syntax checker assumes whichever Python version is in the currently
active environment.
Syntax checking with Pyflakes
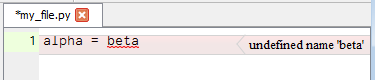
For Python files, the editor frequently runs the pyflakes checking utility in the background, and marks syntax errors/warnings with red/yellow squiggly underlining.
A small ! icon in the status bar shows you the total number of errors and warnings in the current file. If you click this icon, then you will toggle the error description at the right of each affected line.

Tab completion
As you type code, you can use the Tab key to complete the name behind the
cursor. If there are multiple possible completions, a small selection widget
will pop up, allowing you to choose one completion. Tab completion for
imports works as follows:
from numpy import lin<TAB>
If there is a syntax error in the code, tab completion can fail. Tab completion is not performed inside comments or strings.
Inline docstrings
To see the documentation string for a function or class, you can do the following:
linspace<TAB>()
# or
linspace(<TAB>)
# or
linspace()<TAB>
This will show a tooltip with the documentation for the function. However, once any function arguments are supplied, pressing “Tab” will no longer display the docstring for the function. The following case will also not display documentation:
linspace(<TAB>
# some other code below
This is because the code is syntactically wrong since the parenthesis is not closed. In summary, the best way to get help strings is to finish writing the function, supply no arguments and hit tab as shown below:
# Code ...

linspace()<TAB>

# More code.
Goto definition
You can jump to the definition of the name under the cursor, by pressing
Ctrl+j (or Cmd+j on Mac OS X). For example:
from collections import namedtuple
namedtuple<Ctrl+j>(x=1)
This will open the collections.py file in another editor tab at the
definition of the function. Note that you can press Ctrl+j anywhere on the
symbol. This should also work for variables.
Search/Find Options
The Find widget (reached from the Search menu), contains a small magnifying glass icon. Click this to specify Find options (Case, Word, Wrap around, and Regex).
Commenting and uncommenting blocks
Select a block of text using Shift+arrow key or the mouse, and then use
the “Comment lines” command from the Edit menu (shortcut key Ctrl+/;
Cmd+/ on Mac OS X) to comment or uncomment the selection. If you want to
simply comment/uncomment the current line, there is no need to select the
block of text.
Code Indentation
To indent a block of code, select it, and then press the Tab key to indent
it to the right, or Shift+Tab to dedent it to the left.
Sessions
A code editor session (set in the Window menu) records all the files which are open in one or all editor windows, and the cursor position in each file. This is like a lightweight browser session manager or IDE project manager.
File browser Features
File types
By default the file browser shows all recognized source file types (Python, C/C++, FORTRAN, most web file types). This can be changed to show fewer file types or all files by using the “Filter” drop-down menu at the top of the file browser.
Top-level paths
For convenient access to your most commonly used files, the file browser is organized by Top-level Paths. Initially there is one top-level path for your OS home directory, and one for Recent Files. You can set any directory as a top-level path by browsing to it, right-clicking, and selecting Add this as top level.
File Operations
Certain file operations may be available depending on file type. For all files, right-clicking yields a menu where you can copy the file path to clipboard (select “Copy path to clipboard”) or rename or move a file (select “Move/Rename ...”).
Python shell Features
Pylab mode and GUI support
The Python session is a Jupyter QTconsole. By default, it starts in Pylab mode with an interactive GUI backend. This permits you to run and interact with GUI programs while continuing to enter commands at the IPython prompt (e.g. to inspect or modify the GUI’s data). See IPython’s GUI event loop support.
Canopy’s GUI backend for Pylab mode is specified in the Canopy Preferences
dialog, in the Python tab. Beginning with Canopy 2.1.6, the default setting
is auto. This setting allows Canopy to auto-discover the
available/installed GUI backends in the currently connected IPython kernel,
so that pylab / matplotlib should always be able to run. The auto setting
chooses the first available GUI backend from this list:
- Qt4: (PySide or PyQt4 in Python 2.7; PyQt4 in Python 3.x)
- wxPython
- GTK
- TK
- SVG (used for in-line matplotlib graphics, but is not a GUI backend).
You may also explicitly specify one of the above backend settings.
Caution: Pylab mode imports more than 900 numpy and matplotlib names into the console namespace. This can save typing but can lead to confusion when the same names (e.g. sum, min, max, any, all, int) are also Python builtins.
To avoid this problem, you can disable Pylab mode in Canopy’s preferences
dialog, and then, when you want to interact with a GUI program, give IPython’s
%matplotlib magic command (typically %matplotlib qt), at the IPython
prompt. This enables an interactive GUI for plots, but does not pollute your
namespace.
IPython configuration options
IPython has its own extensive configuration system. Canopy reads the default
IPython configuration files to configure its Python shell and notebooks. The
settings in Canopy’s own preferences dialog override the values in the IPython
configuration files. By default, the files ipython_config.py,
ipython_qtconsole_config.py and ipython_notebook_config.py present in
the default IPython profile
are used. If you wish to use a different set of configurations files, you can
add your configuration files with the same names to your application home (See
Where are the preference and log files located?).
Change directory
If you click the drop-down arrow on the Python shell’s title bar (not shown in
screen-shot above), or right-click
within the Python shell, you will see the command “Change to Editor directory”,
which you may use to change IPython’s current working directory to match the
location of the file currently showing in the Code Editor; this uses IPython’s
magic %cd command. For example, this can be convenient when running a demo
program which assumes that its data files are in the current directory. If you
wish, you can also make this the default behavior within the IPython shell, by
selecting the command “Keep Directory Synced to Editor”.
Running editor text in the Python shell
The Run menu contains commands to run code from the editor, in Canopy’s Python shell, running within the currently connected IPython kernel.
The Run command runs the current file in a new namespace in the
connected IPython kernel (using IPython’s magic %run command). No existing
objects (for example, no already-imported modules) will be visible in that
script’s namespace, although they still do exist in the kernel. This command
is the typical way to run a Python script in Canopy’s Python shell.
The Run in Kernel Namespace command also runs the current file in the
connected IPython kernel, but in interactive mode (using IPython’s magic
%run -i command option). This operation is useful when user code needs
to be executed in an existing namespace (e.g. to examine or manipulate objects
which have already been created in the IPython kernel by previous commands).
The Run Selection command runs whatever text is selected in the editor,
in the connected IPython kernel, also in the existing namespace. The difference
is that this copies that text into a single multi-line command in the IPython
shell, then executes that single multi-line command.
Interrupting and restarting the user Python environment
The Run menu contains a command to Interrupt a program running in the IPython shell.
The Run menu also contains a command to Restart the IPython kernel (user Python environment). This can be useful if a running program is frozen and not interruptible, or has corrupted the user Python environment. Note that if you restart the IPython kernel, all computed values in the Python session will be lost.
Connect the Python pane to external IPython kernels
The Python Pane can be connected to another IPython 4+ (Jupyter) kernel. As of Canopy 2.0, kernels running in Python 2.7 and Python 3 are supported. These include kernels started from external Jupyter consoles opened with Canopy, EPD, or EDM, as well as kernels started from Jupyter notebooks and embedded in external applications. Only Enthought’s distribution of IPython is supported. This feature is available from the context (right-click) menu in the Canopy Python pane.
- The available packages are specific to the Python environment where the kernel was started.
- Each kernel has its own namespace, which is not shared with other kernels.
- The Canopy Debugger will work with whichever kernel is active within the Canopy Editor.
- These kernels cannot use Canopy’s Data Import Tool or Package Manager.
Jupyter (IPython) notebook support
For better compatibility with the fast-moving Jupyter project, the Canopy editor opens all Jupyter (IPython) notebooks in your default web browser. For details, see “Using Jupyter (IPython) Notebooks in Canopy” in the Enthought Support Knowledge Base.